Difference between revisions of "Agent installation"
m |
m |
||
| (9 intermediate revisions by the same user not shown) | |||
| Line 1: | Line 1: | ||
| − | [[:Category:Administration|Administration]] > [[:Category:Agents|Agents]] > [[Agent_installation|Agent installation]] | + | [[Welcome_to_Veloopti_help|Home]] > [[:Category:Administration|Administration]] > [[:Category:Agents|Agents]] > [[Agent_installation|Agent installation]] |
---- | ---- | ||
== Overview == | == Overview == | ||
| + | The Veloopti agent runs on a variety of Operating Systems. It can be downloaded from the [[Node_view|node]] page by clicking on the [[file:agent_download.png|35px]] icon with the [[global_options|Global options]] icons. Select the OS type and download the agent. | ||
| + | Click on the X in the top right hand side to close the download dialogue box. | ||
| + | [[file:Agent_download_dialogue.png|center|350px]] | ||
| + | |||
| + | === Disk space required === | ||
| + | The Veloopti agent requires 36 Megabytes of hard disk space. This may increase depending upon the number of policies that the agent is running. Up to an additional 80 Megabytes of disk space could be required when the Veloopti agent is being upgraded. | ||
| + | |||
| + | == Windows installation == | ||
| + | Run the veloopti-setup.exe executable to begin the installation process. You may be prompted to provide an Administrator user account at at this point. | ||
| + | You are presented with the following dialogue box. | ||
| + | [[file:Agent installation windows setup.png|center|350px]] | ||
| + | :[[file:Warning.png|20px]]             '''Note:You may be presented with a dialogue box saying "Windows Defender SmartScreen prevented an unrecognised app from starting". Running this app might put your PC at risk." Click on "Run anyway" to proceed.''' | ||
| + | |||
| + | === Selecting an installation folder === | ||
| + | Veloopti can be installed into any folder on your computer. We recommend that it is installed into the "%systemdrive%\Program Files\" or "%systemdrive%\Program Files (x86)\" folder, depending whether it is a 32 or 64 bit agent. The installation program will automatically select the correct program files folder. Click on the '''options''' button to select a folder to install it to somewhere other than the default. | ||
| + | [[file:Agent installation windows change directory.PNG|center|350px]] | ||
| + | CLick on the '''Install''' button to proceed. | ||
| + | :[[file:Warning.png|20px]]             '''Note:We recommend that the Veloopti agent is not installed into a directory that contains the following characters: , ^ = ; & %. This may cause actions to experience intermittent software issues as windows doesn't always perform well with folders that have these characters in their name.''' | ||
| + | === Authenticating the agent === | ||
| + | After the agent executables are installed it must be configured to be added into a Veloopti organisation. You will need to have [[Permissions|permission]] to do this through [[Roles|roles]]. You are prompted to enter the following details. | ||
| + | # Your Veloopti email address; | ||
| + | # Your Veloopti password; | ||
| + | # If you are a member of multiple organisations you are prompted to select the one you would like this computer to be added to. | ||
| + | Click on the '''close''' button to finish the agent installation process | ||
| + | |||
| + | [[file:Agent installation finished sucessfully.png|centre|350px]] | ||
| + | |||
| + | == Linux installation == | ||
| + | |||
| + | == Registering and re-registering the Veloopti agent == | ||
| + | If an agent is installed but not added to an Veloopti Organisation then it will need to be registered. | ||
| + | |||
| + | Complete the following to register the agent | ||
| + | # Run veloopti.exe /register (win) or veloopti --register (Linix) | ||
| + | # Type your username when prompted | ||
| + | # Type your password when prompted | ||
| + | # If you are a member of multiple organisations, select the organisation that this server should be in | ||
| + | # Run veloopti.exe /check (win) or veloopti --check (Linix) to confirm that the Veloopti installation completed successfully | ||
| + | |||
| + | === Agent installation token === | ||
[[Category:Agents]] | [[Category:Agents]] | ||
Latest revision as of 19:20, 18 June 2020
Home > Administration > Agents > Agent installation
Contents
1 Overview
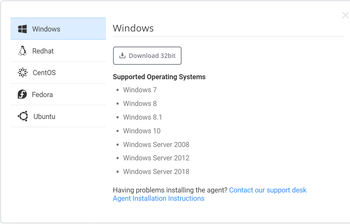
The Veloopti agent runs on a variety of Operating Systems. It can be downloaded from the node page by clicking on the ![]() icon with the Global options icons. Select the OS type and download the agent.
Click on the X in the top right hand side to close the download dialogue box.
icon with the Global options icons. Select the OS type and download the agent.
Click on the X in the top right hand side to close the download dialogue box.
1.1 Disk space required
The Veloopti agent requires 36 Megabytes of hard disk space. This may increase depending upon the number of policies that the agent is running. Up to an additional 80 Megabytes of disk space could be required when the Veloopti agent is being upgraded.
2 Windows installation
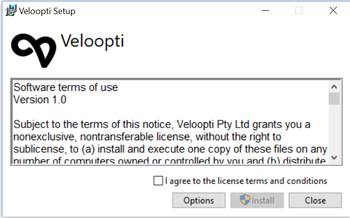
Run the veloopti-setup.exe executable to begin the installation process. You may be prompted to provide an Administrator user account at at this point. You are presented with the following dialogue box.
 Note:You may be presented with a dialogue box saying "Windows Defender SmartScreen prevented an unrecognised app from starting". Running this app might put your PC at risk." Click on "Run anyway" to proceed.
2.1 Selecting an installation folder
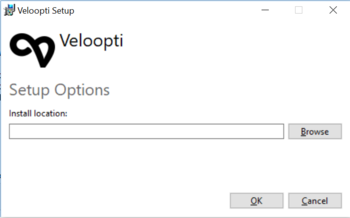
Veloopti can be installed into any folder on your computer. We recommend that it is installed into the "%systemdrive%\Program Files\" or "%systemdrive%\Program Files (x86)\" folder, depending whether it is a 32 or 64 bit agent. The installation program will automatically select the correct program files folder. Click on the options button to select a folder to install it to somewhere other than the default.
CLick on the Install button to proceed.
 Note:We recommend that the Veloopti agent is not installed into a directory that contains the following characters: , ^ = ; & %. This may cause actions to experience intermittent software issues as windows doesn't always perform well with folders that have these characters in their name.
2.2 Authenticating the agent
After the agent executables are installed it must be configured to be added into a Veloopti organisation. You will need to have permission to do this through roles. You are prompted to enter the following details.
- Your Veloopti email address;
- Your Veloopti password;
- If you are a member of multiple organisations you are prompted to select the one you would like this computer to be added to.
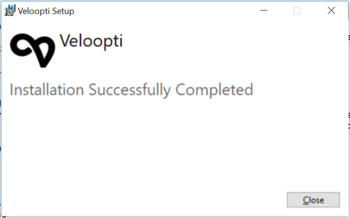
Click on the close button to finish the agent installation process
3 Linux installation
4 Registering and re-registering the Veloopti agent
If an agent is installed but not added to an Veloopti Organisation then it will need to be registered.
Complete the following to register the agent
- Run veloopti.exe /register (win) or veloopti --register (Linix)
- Type your username when prompted
- Type your password when prompted
- If you are a member of multiple organisations, select the organisation that this server should be in
- Run veloopti.exe /check (win) or veloopti --check (Linix) to confirm that the Veloopti installation completed successfully


